Developing for PIC32 Using the Imagination Technologies Codescape Toolchain
Please note: This article is a little out of date. As MIPS Tech. has changed hands a couple of times since this article was written you might need to improvise a bit! Hopefully most of the core ideas remain the same. Please let me know if you have success (or failure) with the current toolchain.
This guide is for those who don't want to use XC32 or would like unrestricted optimisation options without paying out for the non-free Microchip compiler.
Since the PIC32 has a MIPS core, the Imagination Technologies (Who own MIPS) toolchain can be used to generate object code. Most programs should be able to be ported with a little effort.
If you just want to get something working fast, there are a couple of demo projects with everything collected together at the bottom of the page.
What You Will Need
-
The toolchain This ones pretty obvious, comes with all the normal GNU goodies.
-
PIC32 part support The preprocessor defines for processor registers and some other bits to make your life easier when writing/porting your source.
-
Linker script (MX or MZ) and modified reset code A PIC32 specific linker script to store the code in flash, as well as reset code that give the user the option of not copying code from flash to RAM using the
SKIP_COPY_TO_RAMpreprocessor flag.
Installing The Toolchain
Download the file from the link above. On Linux you will need to make the file executable and run it as root for a multi user install. On Windows I assume you can just download and run the executable.
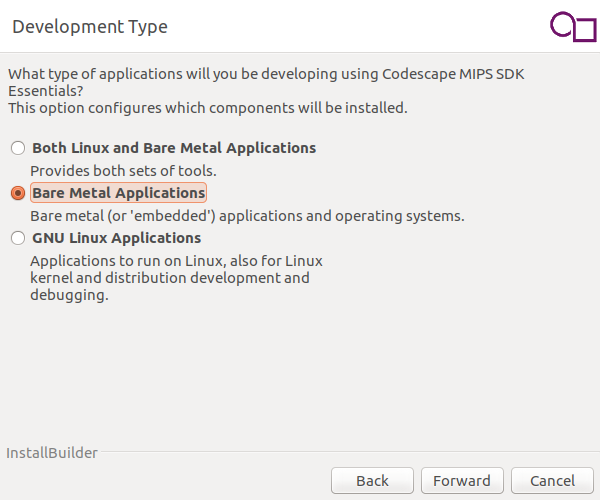
You will be asked where to install the SDK, the default place is probably fine if you don't know better. The second choice to make is whether to install the Linux development components, you don't need them for any PIC32 work so just choose the "Bare Metal Applications" option here.
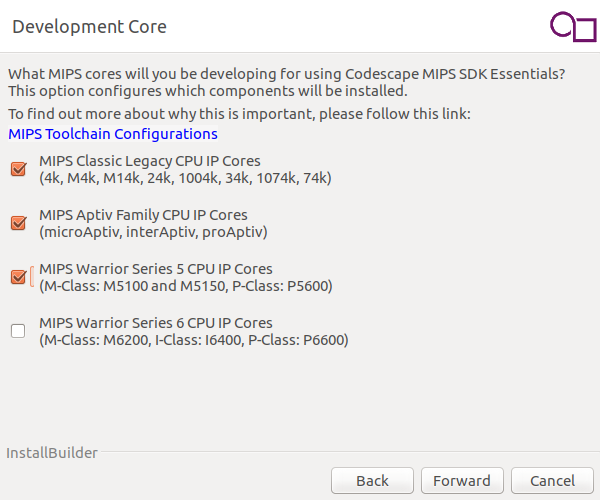
The PIC32 series consists of devices from the microAptiv, M4K and M-class families, if you don't know which category you device falls under, it should be on the datasheet. If you're lazy or planning on developing for multiple types of PIC32 you can select all three.
PIC32 Part Support
This can be used as a library of register locations for PIC32s distributed very kindly by Jason Kajita.
It is up to you if you want to use this or not, it's not technically necessary, but it makes things easier not having to look up the locations of registers, and if you don't like you code filled with magic numbers then you would probably end up building a subset of this anyway.
You will need to include 2 files from this package:
/include/proc/<your_part_no>.h
/proc/<YOUR_PART_NO>/<your_part_no>.S
If the header includes another for backwards compatibility you will need to either find that file in the pic32 part support download and include it in your project or remove the lines that include the file if you do not intend to use any of the legacy functionality it provides.
/* include generic header file for backwards compatibility with old C32 v1.xx code */
/* WARNING: Macros from this file are deprecated and should not be used in new     */
/*          source code.                                                           */
#include "ppic32mx.h"
Linker Script and Reset Code
Pick the appropriate linker script (MX or MZ) and include it in your project. It may be the case that you need to change the location of the config bits to match your device, these locations can be found in the datasheet and can be modified in the linker scripts as below.
 . = __base + 0x0bf0; /* Config bits */
    *(.devcfg3)
    *(.devcfg2)
    *(.devcfg1)
    *(.devcfg0)
} = 0xFFFFFFFF
These linker scripts and the reset code was written by my colleague Neil Jones, so thanks to him and Imagination for allowing me to post them here.
The following is a makefile fragment that shows the inclusion of the MX linker script and the setting of parameters. more information on these parameters can be found in section 15.3 of the toolchain documentation found at imgtec/Documentation/Toolchain/MIPS_
MIPS_MTI_ELF_ROOT ?= /opt/imgtec/Toolchains/mips-mti-elf/2016.05-03
# Overrides the system value that is set to the img-elf toolchain by default
MIPS_ELF_ROOT := $(MIPS_MTI_ELF_ROOT)

ROMABLE := 1

DEFINES += SKIP_COPY_TO_RAM

ABI := 32
APP_START := 0x9d001000
ISR_VECTOR_COUNT := 1
MEMORY_SIZE := 32K
LDSCRIPT := targets/fc1/pic32mx_uhi.ld
include ${MIPS_ELF_ROOT}/share/mips/rules/mipshal.mk

CFLAGS += -march=m4k -EL -msoft-float
LDFLAGS += -march=m4k -EL -msoft-float -Wl,--defsym,__use_excpt_boot=0
LDFLAGS += -Wl,-Map,output.map
Copying Data to RAM
There is a little code that is required to copy the data section from flash to RAM before main executes, this is done using one of the callback hooks provided by the HAL.
extern char _rom_data_copy __attribute__((section(".data")));
extern char _fdata __attribute__((section(".data")));
extern char _edata __attribute__((section(".data")));

void __attribute__((section(".boot"))) software_init_hook(void)
{
    // copy initialised data from its LMA to VMA
    memcpy(&_fdata, &_rom_data_copy, (unsigned long int)&_edata -
        (unsigned long int)&_fdata);
}
Config Bits
Config bits just require variables to be initialised with the required values as below. The section names can be found in the respective linker script, the MZ is significantly more complex than the MX, see the MZ LED flash projects for an example.
unsigned long int DEVCFG0_VAL __attribute__ ((section(".devcfg0"))) = 0xfffffffful;
unsigned long int DEVCFG1_VAL __attribute__ ((section(".devcfg1"))) = 0xfffffffful;
unsigned long int DEVCFG2_VAL __attribute__ ((section(".devcfg2"))) = 0xfffffffful;
unsigned long int DEVCFG3_VAL __attribute__((section(".devcfg3"))) = 0xfffffffful;
Flashing The Device
If you are using a PICkit or similar Microchip inspired tool to upload object code to your MCU, you will need to convert the virtual addresses specified in the elf generated by the Codescape toolchain to physical ones. This can be done using objcpy.
objcpy --change-section-lma .lowerbootflashalias-0xA0000000 \
       --change-section-lma .bootflash1-0xA0000000 \
       --change-section-lma .bootflash2-0xA0000000 \
       --change-section-lma .exception_vector-0x80000000 \
       --change-section-lma .text-0x80000000 \
       --change-section-lma .init-0x80000000 \
       --change-section-lma .fini-0x80000000 \
       --change-section-lma .eh_frame-0x80000000 \
       --change-section-lma .jcr-0x80000000 \
       --change-section-lma .ctors-0x80000000 \
       --change-section-lma .dtors-0x80000000 \
       --change-section-lma .rodata-0x80000000 \
       --change-section-lma .data-0x80000000 \
       --change-section-lma .bss-0x80000000 \
       --change-section-lma .startdata-0x80000000 \
       your.elf your_physical.elf
Flashing an LED
Below are some flashy projects to get you started, they all include a makefile, linker script, the required PIC32 part support files, separate files containing the config and the data copy to RAM, and a c "main" file.
PIC32MX250F128B (Dev board: digilent chipKIT DP32)
PIC32MZ2048EFG100 (Dev board: digilent chipKIT Wi-Fire)
19/04/17